
Introduction
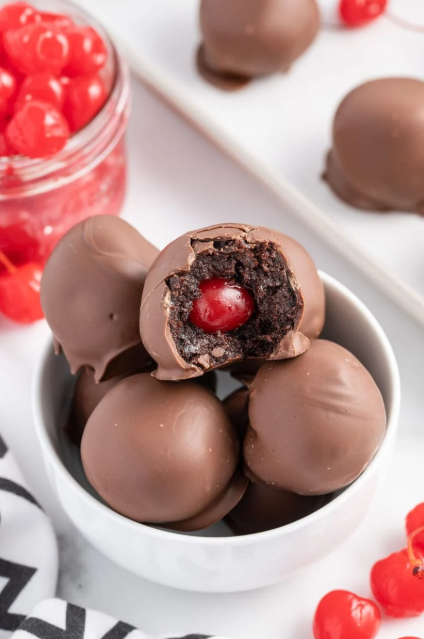
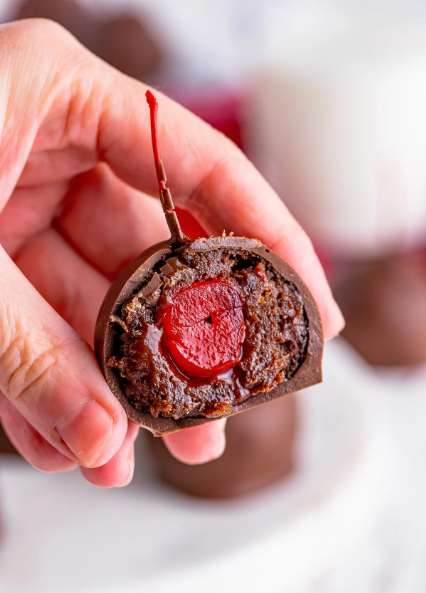
Imagine the ultimate indulgence: a chilled, luxurious chocolate shell cracking open to reveal a rich, fudgy interior, and at its heart, a burst of bright, juicy cherry. This is not merely a dessert; it is an experience—a multi-textured revelation that elevates the humble brownie into the realm of artisanal confectionery. Chocolate Truffles with a Juicy Cherry Center are the perfect union of simplicity and sophistication. They transform a classic pan of brownies and a simple can of frosting into an elegant, handcrafted treat that rivals those found in boutique chocolate shops. The process is as enjoyable as the result, involving hands-on creation that is both fun and deeply satisfying. Perfect for holiday gifting, dinner party finales, or a luxurious personal treat, these truffles offer a stunning presentation and a complex flavor profile that belies their surprisingly simple assembly. They are a testament to the magic that happens when familiar comforts are reimagined with a touch of creativity and a hidden, delightful surprise.
Tips for Successful Cooking
- Brownie Texture is Key: Use a dense, fudgy brownie recipe, not a cakey one. The brownies must be completely cooled before crumbling. Stale or day-old brownies actually work wonderfully here, as they are drier and absorb the frosting more effectively to create a perfect, moldable “dough.”
- The Frosting Factor: The frosting is your binder. Start with 1 cup and mix thoroughly before deciding to add more. The ideal consistency is that of a soft, pliable Play-Doh—able to hold its shape when rolled but not sticky. If the mixture is too wet, add a tablespoon of cocoa powder; if too dry, add frosting by the teaspoon.
- The Freeze is Non-Negotiable: After forming the truffles around the cherries, you must freeze them solid for at least one hour. This step is critical for a clean, easy dip. A frozen center prevents the truffle from falling apart in the warm chocolate and ensures the cherry juice doesn’t leak and cause the coating to seize.
- Master the Chocolate Dip: Use high-quality chocolate melting wafers (like Ghirardelli or Candiquik) for the coating. They are formulated to melt smoothly, set with a snap, and require no tempering. Melt slowly (using 30-second bursts in the microwave, stirring between each) to avoid burning. When dipping, use a fork or dipping tool, tap off excess chocolate gently, and slide the truffle onto parchment paper for a clean bottom.
- Work Quickly and Decorate: The chocolate shell will set fast on the frozen truffle. Have your sprinkles or drizzle ready to go immediately after dipping each one, as the setting chocolate will act as “glue” for your decorations.
Frequently Asked Questions (FAQ)
Q: Can I use boxed brownies and canned frosting?
A: Absolutely! This recipe is designed for convenience. A standard 9×13 family-sized box of brownie mix and a standard 16oz can of chocolate frosting will yield the perfect amount of “dough.”
Q: My truffle mixture is too sticky to handle. What can I do?
A: This means your mixture has too much frosting or your brownies were too fresh/moist. To rescue it, gradually knead in a little cocoa powder or even some finely crushed graham cracker crumbs until it reaches a workable consistency. Chilling the mixture for 20 minutes can also help.
Q: Can I use fresh cherries instead of maraschino?
A: It’s not recommended. Maraschino cherries are preserved and have a firmer texture and consistent sweetness that won’t make the truffle interior soggy. Fresh or frozen cherries contain too much free water.
Q: How far in advance can I make these?
A: They are excellent make-ahead treats. Once fully set, store them in a single layer in an airtight container in the refrigerator for up to 1 week. For longer storage, you can freeze them for up to 2 months. Thaw in the refrigerator before serving.
Q: Can I use different coatings?
A: Yes! Get creative. Use dark, milk, or white chocolate wafers. You can also roll the truffles in cocoa powder, crushed nuts, or coconut before the chocolate sets for a different finish.
Q: Why is my chocolate coating cracking?
A: This is usually caused by a temperature shock. If the frozen truffle center is too cold and the melted chocolate is too hot, the shell will contract and crack as it sets. Ensure your melted chocolate is just warm to the touch (about 90-95°F) and not piping hot.
The Recipe: Chocolate Truffles with a Juicy Cherry Center
Prep Time: 20 minutes | Cooling/Freezing Time: 60 minutes | Total Time: 1 hour 20 minutes
Kcal: ~230 kcal per truffle | Servings: 18 truffles
Ingredients
- For the Truffle Center:
- 1 standard 9×13 pan of baked brownies, fully cooled (approx. 4 cups of fine crumbs)
- 1 to 1 ¼ cups chocolate frosting, at room temperature
- 18 maraschino cherries, thoroughly drained and patted very dry with paper towels
- For the Coating & Decoration:
- 16 oz (approx. 2 ½ cups) white or milk chocolate melting wafers
- 6 oz semi-sweet chocolate or chocolate wafers, for drizzling (optional)
- Sprinkles, edible glitter, or flaky sea salt for decoration (optional)
Directions
- Create the Truffle Dough: In a large bowl, crumble the cooled brownies into very fine crumbs using your fingers. Add 1 cup of the chocolate frosting. Mix with a spatula or your hands until it comes together into a uniform, smooth, and pliable dough. If it’s too dry and won’t hold together, add more frosting, one tablespoon at a time, until the desired consistency is reached.
- Form the Bombs: Scoop out a heaping tablespoon of the brownie dough (about 25g). Flatten it into a disc in the palm of your hand. Place one well-dried maraschino cherry in the center. Carefully wrap the dough around the cherry, pinching it closed and rolling gently between your palms to form a smooth, round ball. Ensure the cherry is completely sealed inside. Repeat with remaining dough and cherries.
- Freeze: Place the formed truffles on a parchment-lined baking sheet or plate. Freeze, uncovered, for at least 1 hour, until completely solid.
- Melt the Coating: About 10 minutes before the truffles are ready, melt the chocolate wafers according to package directions (typically in a deep, microwave-safe bowl in 30-second bursts, stirring until smooth).
- Dip the Truffles: Remove a few truffles from the freezer at a time (keeping the rest cold). Using a fork or a specialty dipping tool, submerge one frozen truffle completely in the melted chocolate. Lift it out, gently tap the fork on the edge of the bowl to remove excess chocolate, and carefully slide it onto a fresh piece of parchment paper.
- Decorate (Act Fast!): Immediately after dipping, while the chocolate is still wet, decorate with sprinkles or a pinch of edible glitter. If drizzling, let the base coat set for 5 minutes, then use a fork or piping bag to drizzle with melted semi-sweet chocolate.
- Set and Serve: Allow the chocolate coating to harden completely at room temperature (about 30 minutes) or in the refrigerator for 15 minutes. For the best texture and flavor, store and serve these truffles slightly chilled.
Conclusion
Creating Chocolate Truffles with a Juicy Cherry Center is an act of culinary alchemy. It demonstrates how a few simple ingredients, guided by a bit of technique and patience, can be transformed into a gift-worthy, professional-looking delicacy. The joy of biting through the crisp chocolate shell into the soft, fudgy brownie and finally discovering the tangy-sweet cherry heart is a multi-sensory delight that never fails to impress. These truffles are more than a recipe; they are a conversation piece, a labor of love, and a guaranteed way to end any meal on a spectacular note. So, gather your brownies, embrace the slightly messy fun of rolling and dipping, and prepare to unveil the hidden treasure at the heart of your very own handmade chocolate truffles.
