Introduction
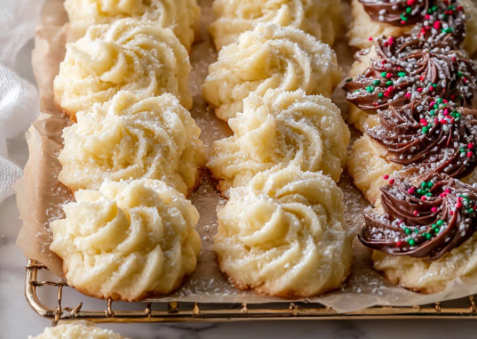
Few treats evoke a sense of nostalgia quite like the iconic Danish butter cookie. Known worldwide from the iconic blue tins that often become sewing kits, these delicate, melt-in-your-mouth delights are the epitome of simple, buttery elegance. With their signature piped swirls and rosettes, they are as beautiful to look at as they are delicious to eat. While the store-bought version is familiar, the homemade rendition is a revelation—fresher, richer, and infused with the warmth of pure vanilla.
This recipe demystifies the process, showing you how to recreate that classic texture and flavor in your own kitchen with just six basic ingredients. More than just a cookie, mastering this recipe is a rite of passage for any home baker. It’s about achieving the perfect pipeable consistency, the precise golden edge, and that unforgettable sandy-yet-tender crumb. Let’s bring the charm of the classic tin to your holiday table, fresh from your oven.
Tips for Successful Cooking
The difference between good and exceptional Danish butter cookies lies in the details.
- Butter Temperature is Everything: Your butter must be properly softened (cool to the touch but easily indented) to achieve a pale, fluffy base. If it’s too cold, it won’t cream properly; if it’s melted, the cookies will spread and lose their shape.
- Sift for Smoothness: Sifting the confectioners’ sugar and flour is not a suggestion—it’s a requirement. This removes lumps and aerates the dry ingredients, which is crucial for creating a smooth, pipeable dough without overmixing.
- Master the Piping Bag: If your dough is too stiff to pipe, it hasn’t been creamed long enough or the flour was over-measured (always spoon and level!). If it’s too runny and doesn’t hold its shape, the butter may have been too warm. The dough should pipe with slight resistance, forming clean, defined shapes.
- The Golden Rule: Watch the oven closely. The cookies are done when the edges are just turning a light golden brown, while the centers remain pale. Over-baking by even a minute can rob them of their delicate texture.
- Patience with Cooling: These cookies are very fragile when warm. Allow them to cool completely on the baking sheet. This lets them set and firm up, preventing them from crumbling when moved. The wait is worth it for the perfect snap.
Frequently Asked Questions (FAQ)
Q: Can I use salted butter?
A: You can, but omit the added ½ teaspoon of salt from the recipe. For the most controlled, pure butter flavor, unsalted is best.
Q: My dough is too soft and won’t hold its piped shape. What can I do?
A: Chill the piping bag (with the dough inside) in the refrigerator for 15-20 minutes. This will firm up the butter, making the dough easier to handle and hold its shape on the baking sheet.
Q: I don’t have a piping bag. Can I still make these?
A: Yes, though the shape will differ. You can roll teaspoon-sized portions of dough into balls, place them on the sheet, and gently flatten with a fork dipped in sugar (like classic shortbread). The texture will be the same.
Q: How can I customize the flavor?
A. While vanilla is classic, you can add:
* Citrus: Add 1 tbsp of finely grated lemon or orange zest with the butter.
* Almond: Substitute ½ tsp of the vanilla with pure almond extract.
* Topping: Before baking, sprinkle piped cookies with pearl sugar or finely chopped nuts.
Q: How should I store them, and how long do they last?
A: Store in an airtight container at room temperature for up to 2 weeks. They are perfect for making ahead! For true authenticity, store them in a decorative tin. They also freeze beautifully for up to 3 months.
Q: Why are my cookies spreading or losing their shape?
A. This is almost always due to: 1) Butter that was too warm/softened to the point of being greasy, or 2) An oven that wasn’t fully preheated. Ensure your butter is cool-soft and your oven is at 350°F before baking.
The Recipe: Classic Danish Butter Cookies
Prep Time: 15 minutes | Cook Time: 12 minutes | Total Time: 27 minutes
Kcal: 110 kcal | Servings: 24 cookies
Ingredients
- 1 cup (227g) unsalted butter, softened
- 1 cup (120g) confectioners’ (powdered) sugar, sifted
- 2 cups (250g) all-purpose flour, spooned, leveled, and sifted
- 2 tablespoons whole milk
- 2 teaspoons pure vanilla extract
- ½ teaspoon fine salt
Directions
- Prep: Preheat your oven to 350°F (175°C). Line two baking sheets with parchment paper.
- Cream Butter & Sugar: In a large mixing bowl using a hand mixer or stand mixer fitted with the paddle attachment, beat the softened butter and sifted confectioners’ sugar together on medium-high speed for 3-4 minutes. Stop to scrape down the sides as needed. The mixture should become very pale, creamy, and fluffy.
- Add Wet Ingredients: Beat in the vanilla extract and milk until just fully incorporated.
- Incorporate Dry Ingredients: Add the sifted all-purpose flour and salt to the bowl. Mix on low speed just until the flour is absorbed and a smooth, cohesive dough forms. Do not overmix.
- Pipe: Fit a large piping bag with a large open-star tip (such as a 1M or 4B). Fill the bag with the cookie dough. Pipe rosettes or classic “swirl” circles onto the prepared baking sheets, spacing them about 1.5 inches apart to allow for slight spreading.
- Bake: Bake one sheet at a time in the center of the oven for 10-12 minutes. The cookies are done when the bottoms and edges are lightly golden, while the tops and centers remain pale.
- Cool: Remove from the oven and let the cookies cool on the baking sheet for 10 minutes. Then, transfer them carefully to a wire rack to cool completely. They will crisp up as they cool.
Conclusion
Homemade Danish butter cookies are a celebration of simplicity and technique. They prove that with the finest butter, a touch of sugar, and a little patience, you can create a confection that surpasses its iconic store-bought counterpart. The process of piping each delicate swirl is a meditative and rewarding act, resulting in a batch of cookies that are truly gift-worthy.
Savoring one of these freshly baked, buttery gems with a cup of coffee or tea is a moment of pure bliss. By mastering this recipe, you reclaim the iconic blue tin, filling it not just with cookies, but with the love and care of your own kitchen. So, preheat your oven, sift that flour, and get ready to pipe a tray of edible nostalgia.
