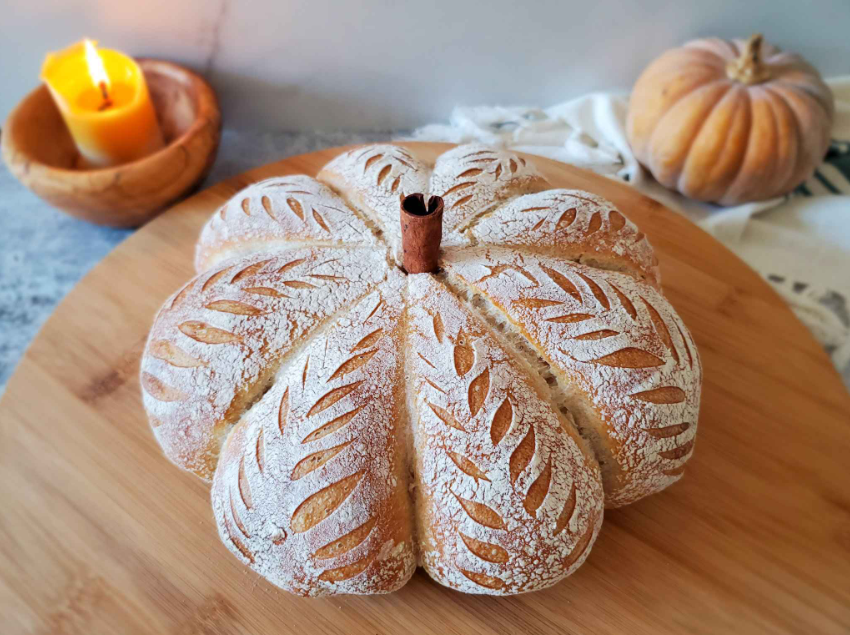
There’s something undeniably magical about the fusion of tangy, wild-fermented sourdough and the warm, earthy sweetness of pumpkin. Pumpkin Sourdough Bread is more than just a seasonal novelty; it’s a masterpiece of flavor and texture. It boasts a crackling, blistered crust that gives way to a moist, tender, and strikingly orange-hued crumb, speckled with warm spices. The natural sugars from the pumpkin caramelize during baking, creating a complex loaf that is equally at home on your Thanksgiving table as it is in your morning toast slot.
This recipe is a journey, a rewarding process that connects you to the oldest form of baking. Let’s create a loaf that celebrates the harvest and the art of sourdough.
Recipe: Pumpkin Sourdough Bread
Yields: 1 large boule (round loaf)
Prep time: 30 minutes (active) + 30 minutes (stretch and folds)
Fermentation time: 4-8 hours (bulk fermentation) + 12-16 hours (cold proof)
Bake time: 45-50 minutes
Ingredients:
- For the Leaven:
- 30g active sourdough starter
- 60g bread flour
- 60g warm water
- For the Dough:
- 300g bread flour
- 100g whole wheat flour (for added flavor and nutrition)
- 250g pure pumpkin puree (canned or homemade*)
- 100g warm water (adjust as needed)
- 90g active leaven (all of the above)
- 9g fine sea salt
- 2 Tbsp (30g) brown sugar or maple syrup
- 1 tsp ground cinnamon
- 1/2 tsp ground ginger
- 1/4 tsp ground nutmeg
- (Optional) 1/4 tsp ground cloves or allspice
- For Topping (Optional):
- Pumpkin seeds (pepitas)
- Rolled oats
Equipment:
- Digital kitchen scale (highly recommended for accuracy)
- Mixing bowl
- Bench scraper
- Banneton proofing basket (or a bowl lined with a floured tea towel)
- Dutch oven
Instructions
1. Build the Leaven (8-12 hours before mixing):
In a small jar or bowl, combine the 30g active starter, 60g flour, and 60g water. Mix thoroughly, cover loosely, and let it sit at room temperature. It is ready when it has doubled in size, is bubbly, and passes the float test (a small spoonful dropped in water floats).
2. Autolyse (30 minutes before mixing):
In a large mixing bowl, whisk together the bread flour and whole wheat flour. In a separate bowl or measuring cup, mix the pumpkin puree with the 100g of warm water and spices until smooth. Add this pumpkin mixture to the flours and mix until no dry bits remain. The dough will be shaggy. Cover the bowl and let it rest for 30 minutes. This autolyse allows the flour to fully hydrate, making the dough easier to work with and improving its final structure.
3. Mix the Dough:
Add the 90g of active leaven and the salt to the autolysed dough. Use wet hands to pinch and squeeze the ingredients together until fully incorporated. The dough will be sticky and slack—this is normal due to the pumpkin.
4. Bulk Fermentation (4-8 hours):
This is the first rise. Cover the bowl and place it in a warm spot (75-80°F / 24-27°C is ideal). Over the next 2.5 to 3 hours, you will perform a series of “coil folds” or “stretch and folds” to build strength in the dough.
- Every 30 minutes for the first 2 hours, perform a set of coil folds: With wet hands, reach under one side of the dough, stretch it up, and fold it over the center. Rotate the bowl 90 degrees and repeat 3-4 more times until the dough feels tighter.
- Let the dough rest, covered, for the remainder of the bulk fermentation. It is ready when it has increased in volume by about 30-50%, is dotted with small bubbles on the surface, and has a smooth, domed top.
5. Shape and Cold Proof (12-16 hours):
Lightly flour your work surface and gently turn the dough out. Shape it into a tight boule (round) or batard (oval). Place the shaped dough seam-side up into a well-floured banneton (use rice flour to prevent sticking). Cover with a plastic bag or shower cap and immediately place it in the refrigerator for a long, slow cold proof.
6. Bake:
- Preheat your oven with a Dutch oven inside to 450°F (230°C) for at least 45 minutes.
- Remove the dough from the fridge. Place a piece of parchment paper over the banneton and carefully flip it over to turn the dough out onto the paper.
- Score the top of the loaf with a sharp lame or razor blade in a pattern of your choice (a simple “X” or a pumpkin-inspired design works well).
- Carefully transfer the dough (using the parchment as a sling) into the preheated Dutch oven. Cover with the lid.
- Bake covered for 20 minutes. This traps steam, creating a beautiful oven spring and a crisp crust.
- Remove the lid, reduce the oven temperature to 425°F (220°C), and bake for another 25-30 minutes uncovered, until the crust is deeply golden brown and the internal temperature reaches 208-210°F (98-99°C).
- Crucial Step: Let the loaf cool completely on a wire rack for at least 3-4 hours before slicing. The interior is still cooking from residual heat, and slicing too early will result in a gummy crumb.
Frequently Asked Questions (FAQ)
Q: Can I use canned pumpkin?
A: Absolutely. Canned pure pumpkin puree (not pumpkin pie filling, which has added sugar and spices) works perfectly and is very consistent. If using homemade, make sure it’s thick and not watery.
Q: My dough is very sticky and slack. Did I do something wrong?
A: This is completely normal! Pumpkin puree adds a significant amount of moisture. The high hydration is what creates that incredibly moist, open crumb. Trust the process, use wet hands during handling, and rely on the coil folds to build strength.
Q: Why did my bread not rise much in the oven (poor oven spring)?
A: This can have a few causes:
- Under-proofed: The dough didn’t ferment long enough during bulk.
- Over-proofed: The dough fermented for too long and the yeast exhausted itself.
- Weak starter: Ensure your starter is active and bubbly before building the leaven.
- Scoring too deep or too shallow: A confident, swift score about 1/2 inch deep is ideal.
Q: Can I add nuts or seeds to the dough?
A: Yes! Toasted pecans, walnuts, or pepitas are wonderful additions. Add about 1/2 to 3/4 cup during the final set of folds in the bulk fermentation stage to distribute them evenly.
Q: How do I store this bread?
A: Due to its high moisture content, it’s best stored cut-side down on a cutting board for the first 2 days. For longer storage, keep it in a paper bag inside a plastic bag to maintain the crust. It also freezes beautifully; slice it first and toast slices directly from frozen.
Pro Tips for Success
- The Float Test is Key: Never skip testing your leaven. If it doesn’t float, your bread will be dense. Wait another hour and test again.
- Control Your Temperature: Bulk fermentation time is highly dependent on temperature. In a cooler kitchen, it will take longer. Use your oven with the light on or a slightly warmed microwave as a “proofing box” to create a consistent warm environment.
- Adjust Hydration: The water content of pumpkin puree can vary. When adding the water in the autolyse, start with 80g and add the remaining 20g only if the dough feels too stiff.
- Don’t Skip the Cold Proof: The long, cold fermentation in the fridge is not just for schedule convenience; it develops a much more complex, tangy flavor and makes the dough easier to score.
- Measure by Weight: Baking is a science, especially with sourdough. A digital scale is the single most important tool for consistent results.
Conclusion
Baking Pumpkin Sourdough Bread is a deeply rewarding experience that fills your home with the quintessential aromas of autumn. It’s a beautiful marriage of art and science, patience and intuition. While the process may seem long, the hands-on time is minimal, and the result is a loaf that is far superior to anything found on a store shelf.
This bread is a celebration—of the season, of tradition, and of the simple, profound joy of creating something nourishing and beautiful with your own hands. So, feed your starter, gather your ingredients, and embrace the process. You are about to bake not just bread, but a memory. Happy baking
