Autumn arrives on a breeze scented with cinnamon and decay, a season of cozy sweaters, crackling fires, and the undeniable, deep-seated craving for pumpkin. For generations, the answer to this call has been the pumpkin pie—a noble, classic dessert that holds a sacred place on the holiday table. But what if we could capture the very soul of fall—the spice, the pumpkin, the comforting warmth—and repackage it into something even more irresistible, more texturally thrilling, and undeniably crowd-pleasing?
Enter the “Better Than Fall Pumpkin Pie” Cake. This dessert is not just a clever name; it’s a promise. It takes the familiar flavors we adore and layers them into a show-stopping creation that is moist, creamy, crunchy, and decadent all at once. It’s the ease of a box cake mix transformed into a gourmet-level experience, a dessert that will have your guests asking for the recipe long after the last leaf has fallen.
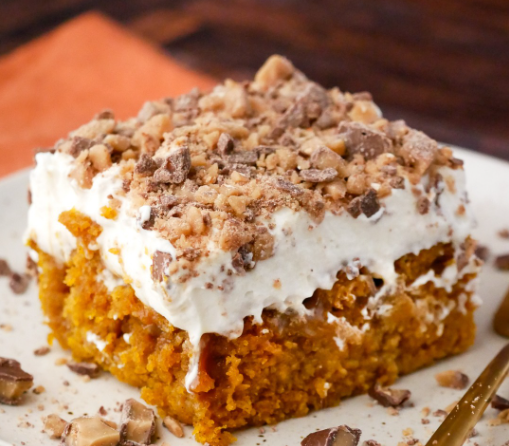
The Anatomy of a Masterpiece: Deconstructing the Layers of Flavor
The magic of this dessert lies in its brilliant construction. Each component plays a critical role, building upon the last to create a symphony of texture and taste.
- The Foundation: The Pumpkin-Spiced Cake. We begin not from scratch, but with a brilliant shortcut: a vanilla cake mix. This provides a reliable, tender, and sweet base. But the real genius is stirring in a full cup of pumpkin puree. This single act accomplishes three things: it infuses the entire cake with the quintessential flavor of the season, it adds incredible moisture that ensures the cake remains supple even after chilling, and it gives the crumb a beautiful warm, autumnal hue. The result is a cake that tastes lovingly homemade, with the perfect, pillowy texture.
- The Heart: The Sweetened Condensed Milk Soak. This is the “poke” in “poke cake,” and it is the transformative step. While the cake is still warm from the oven, we perforate it, creating a network of channels. Slowly, we pour rich, velvety sweetened condensed milk over the top. The warm cake acts like a sponge, greedily absorbing the thick, creamy liquid into its very core. This step is what elevates the cake from simply “moist” to luxuriously, almost pudding-like rich. It adds a deep, caramelized sweetness that perfectly complements the earthy pumpkin.
- The Cloud: The Cool Whip Topping. Where the previous layer is rich and dense, this one is light and airy. The layer of thawed Cool Whip provides a essential counterpoint. Its cool, mild creaminess cuts through the sweetness of the soaked cake, offering a refreshing palate cleanser in every bite. It also creates a perfectly smooth and stark white canvas for the final, decorative elements.
- The Crown: The Caramel and Toffee Crunch. And now, for the pièce de résistance. A generous drizzle of caramel sundae topping adds a gooey, buttery sweetness that ribbons across the white landscape. Finally, a hearty blanket of Heath candy bits or crushed toffee is sprinkled over everything. This provides the crucial element of textural contrast—a satisfying, brittle crunch that plays against the soft cake, the creamy soak, and the fluffy topping. It’s the unforgettable finish that makes every single bite a complex and delightful experience.
The Recipe: Better Than Fall Pumpkin Pie
This dessert is a marvel of simplicity, delivering maximum impact for minimal effort. It’s the perfect recipe for busy bakers who want to impress.
Yields: 12 generous servings
Prep time: 15 minutes
Cook time: 25 minutes
Chill time: 1 hour (minimum)
Total time: 1 hour 40 minutes
Ingredients:
- 1 box (approx. 15.25 oz) vanilla cake mix
- The ingredients required to prepare the cake mix (typically 3 eggs, ½ cup oil, 1 cup water – check your box)
- 1 cup pure pumpkin puree (not pumpkin pie filling)
- 1 can (14 oz) sweetened condensed milk
- 1 tub (8 oz) Cool Whip, thawed in the refrigerator
- ½ cup caramel sundae topping, plus more for serving
- 1 cup Heath English Toffee Bits (or crushed chocolate-covered toffee bars)
Equipment:
- 9×13-inch baking dish
- Wooden spoon or handle of a sturdy utensil
- Mixing bowls and whisk
- Spatula
Method:
Step 1: The Pumpkin-Infused Base
Preheat your oven to 350°F (175°C). Grease and flour a 9×13-inch baking dish thoroughly, ensuring every corner is coated to prevent sticking.
In a large mixing bowl, prepare the vanilla cake mix according to the package directions. Once the batter is smooth, gently fold in the pumpkin puree. Stir until the pumpkin is fully incorporated and the batter is a uniform orange color. Pour the batter into the prepared pan and spread it evenly into the corners.
Step 2: The Bake
Place the pan in the preheated oven and bake for 25-30 minutes, or until a toothpick inserted into the center of the cake comes out clean or with a few moist crumbs. The cake should be springy to the touch.
Step 3: The Transformative Soak
As soon as the cake comes out of the oven, take the handle of a wooden spoon and poke holes all over the surface. Space them about 1 inch apart and push the handle down until you feel the bottom of the pan. Don’t be shy—this creates the pathways for the goodness to come.
Slowly, and we mean slowly, pour the entire can of sweetened condensed milk over the warm cake. Start at one end and move back and forth, aiming for the holes. Take your time to allow the milk to seep down into the cake, saturating it completely. This is the step that makes the cake impossibly rich and moist.
Step 4: The Patient Cool
This is a test of willpower. You must allow the cake to cool completely at room temperature. Rushing this step by putting it in the fridge will cause the topping to melt and become a runny mess. Let it sit for at least an hour until the pan is no longer warm to the touch.
Step 5: The Finishing Touches
Once the cake is completely cool, use a spatula to spread the entire tub of thawed Cool Whip over the surface in an even, smooth layer.
Drizzle the caramel topping generously back and forth over the Cool Whip. For a beautiful presentation, you can warm the caramel slightly to make it easier to drizzle.
Sprinkle the Heath toffee bits evenly over the entire cake, pressing down gently so they adhere to the topping.
Step 6: The Final Chill
Cover the cake and refrigerate it for at least one hour before serving. This allows everything to set firmly, making it easy to slice into clean, beautiful squares.
Serving Suggestions & Pro-Tips for Perfection:
- Make-Ahead Marvel: This cake is actually better the next day! The flavors have more time to meld together. Prepare it a day in advance and keep it covered in the refrigerator.
- The Extra Drizzle: Serve each slice with a little extra caramel sauce on the side for your true caramel enthusiasts.
- Coffee’s Best Friend: The rich, sweet flavors of this cake pair beautifully with a hot cup of black coffee or a latte, making it an incredible dessert for a fall brunch or dinner party.
- Storage: Keep any leftovers (if there are any!) covered in the refrigerator for up to 4 days.
A Final Slice of Wisdom
The “Better Than Fall Pumpkin Pie” Cake is more than a dessert; it’s an experience. It understands that comfort food is about more than just taste—it’s about the joy of contrasting textures, the beauty of its layers, and the shared delight it brings to a table full of friends and family. It respects the tradition of pumpkin pie while confidently carving out its own, modern legacy. So this fall, embrace the new classic. One bite, and you’ll agree—it truly lives up to its name.
