Introduction
Few store-bought cookies hold a candle to the nostalgic, iconic flavor of a Nutter Butter. That distinct peanut-shaped cookie, with its crisp texture and rich, creamy peanut butter filling, is a treat beloved by many. However, the magic of recreating this classic in your own kitchen is an experience that surpasses simply opening a package.
Homemade Nutter Butters offer a depth of flavor and a satisfying texture that their mass-produced counterparts can’t match. By using real, wholesome ingredients like creamy peanut butter, butter, and brown sugar, you create a cookie that is far superior. You control the sweetness, the saltiness, and the quality of every component.
This recipe guides you through creating the perfect peanut-shaped cookies, from getting the classic criss-cross pattern to whipping up a filling that is irresistibly smooth and peanut buttery. While the process is fun and straightforward, it does require a few steps. This article will provide the complete recipe, crucial tips for success, and then answer all your potential questions in a detailed FAQ to ensure your homemade version is nothing short of spectacular.
The Anatomy of a Perfect Homemade Nutter Butter
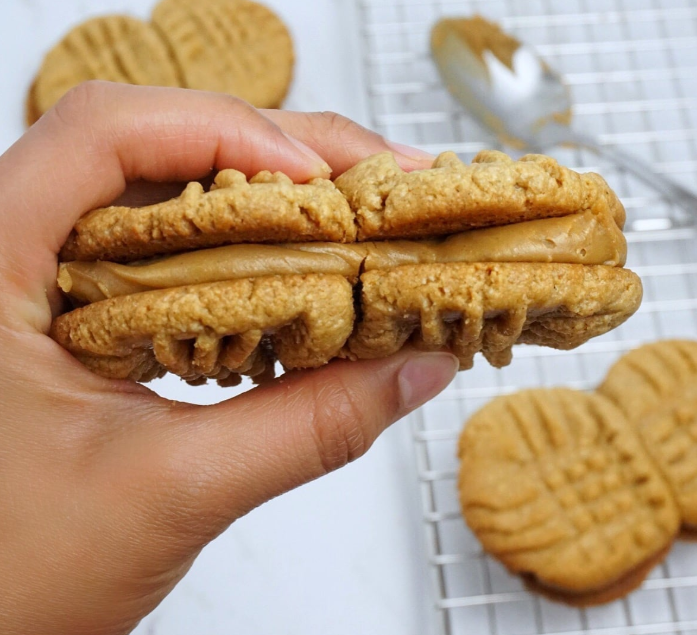
- The Cookie: The base is a soft, chewy peanut butter cookie. Using both brown sugar and granulated sugar creates a complex sweetness and a tender crumb. Rolling the dough logs in sugar before baking gives them a delightful slight crunch on the outside.
- The Filling: This is the heart of the operation. A simple blend of softened butter, peanut butter, and powdered sugar creates a creamy, pipeable, and intensely peanut-buttery center that holds the two cookies together perfectly.
- The Shape: The signature peanut shape and fork marks are what make these cookies instantly recognizable. It’s a fun, hands-on step that makes the baking process engaging.
Why You Should Make Them From Scratch
- Superior Flavor: Freshly baked cookies with real butter and high-quality peanut butter have a rich, authentic taste that boxed cookies lack.
- No Preservatives: You know exactly what’s going into your treats—no unpronounceable ingredients or artificial flavors.
- The Satisfaction: There’s an immense pride and joy that comes from baking a famous treat from scratch and sharing it with friends and family.
The Recipe: Homemade Nutter Butters
Yields: 12 sandwich cookies
Prep Time: 25 minutes
Cook Time: 10 minutes per batch
Total Time: 45 minutes (plus cooling time)
Kcal: ~230 kcal per cookie
Ingredients
For the Cookies:
- 1 1/2 cups all-purpose flour
- 1 teaspoon baking soda
- 1/4 teaspoon kosher salt
- 1/2 cup (1 stick) unsalted butter, softened
- 1 cup light brown sugar, packed
- 1 cup creamy peanut butter
- 1 large egg, room temperature
- 1/2 teaspoon pure vanilla extract
- 1/2 cup granulated sugar (for rolling)
For the Peanut Butter Filling:
- 1/4 cup (1/2 stick) unsalted butter, softened
- 1/2 cup creamy peanut butter
- 1 1/2 cups powdered sugar, sifted
- 2 tablespoons milk (any kind)
- 1/4 teaspoon vanilla extract
Instructions
1. Prep: Preheat your oven to 350°F (175°C). Line two baking sheets with parchment paper or silicone baking mats. Pour the 1/2 cup of granulated sugar into a small, shallow bowl and set aside.
2. Combine Dry Ingredients: In a medium bowl, whisk together the 1 1/2 cups of flour, 1 teaspoon of baking soda, and 1/4 teaspoon of kosher salt. Set this aside.
3. Cream Wet Ingredients: In the bowl of a stand mixer fitted with the paddle attachment (or using a large bowl and an electric hand mixer), cream together the softened 1/2 cup butter, 1 cup of brown sugar, and 1 cup of peanut butter on medium speed until light and fluffy, about 2-3 minutes.
4. Add Egg and Vanilla: Scrape down the sides of the bowl. Add the 1 large egg and 1/2 teaspoon of vanilla extract. Mix on medium speed until fully incorporated.
5. Incorporate Dry Ingredients: With the mixer on low speed, gradually add the flour mixture to the wet ingredients. Mix until just combined. Be careful not to overmix.
6. Shape the Cookies: Using a cookie scoop or tablespoon, portion the dough into 24 equal pieces (about 1 1/2 tablespoons each). Roll each piece into a small ball, then shape it into a log. Roll each log in the bowl of granulated sugar until fully coated.
7. Form the “Peanut” Shape: Place the sugar-coated dough logs on the prepared baking sheets, spacing them about 2 inches apart. Use a fork to gently press a criss-cross pattern onto the top of each log. Then, gently pinch the middle of each log to create the classic peanut shape.
8. Bake: Bake for 10-12 minutes, or until the edges are lightly golden but the centers still look soft. They will firm up as they cool.
9. Cool: Allow the cookies to cool on the baking sheet for 5 minutes before transferring them to a wire rack to cool completely.
10. Make the Filling: While the cookies cool, prepare the filling. In a clean mixer bowl, beat the softened 1/4 cup butter and 1/2 cup peanut butter together on medium speed until smooth and fluffy. Gradually add the sifted 1 1/2 cups of powdered sugar, 2 tablespoons of milk, and 1/4 teaspoon of vanilla. Mix on low until combined, then increase speed to high and beat for 1-2 minutes until light and creamy.
11. Assemble the Cookies: Once the cookies are completely cool, pair them up by size. Turn one cookie from each pair upside down. Pipe or spoon about 1 tablespoon of filling onto the bottom cookie. Gently press the matching cookie on top to create a sandwich.
Tips for a Successful Recipe
- Properly Softened Butter: This is key for both the cookie and the filling. Your butter should be soft enough to leave an indent when pressed, but not oily or melted. Leave it on the counter for 30-60 minutes before you start.
- Don’t Overmix the Dough: Once you add the flour, mix only until the streaks of flour disappear. Overmixing develops gluten, leading to tough, dense cookies.
- Weigh Your Ingredients: For the most consistent results, use a kitchen scale. 1 1/2 cups of all-purpose flour should weigh 180 grams. This ensures you don’t accidentally use too much flour, which is the main cause of dry cookies.
- Chill if Necessary: If your dough feels too soft or sticky to shape after mixing, don’t be afraid to chill it for 20-30 minutes. This prevents the cookies from spreading too much in the oven.
- Cool Completely Before Filling: Assembling the cookies while they are even slightly warm will cause the filling to melt and become a messy ooze. Patience is a virtue here!
- Sift the Powdered Sugar: For an ultra-smooth and creamy filling without any lumps, always sift your powdered sugar before adding it to the butter and peanut butter.
Frequently Asked Questions (FAQ)
Q1: Can I use natural peanut butter?
A: We do not recommend using natural peanut butter (the kind with oil separation) for this recipe. The added oils can make the dough too greasy and spread too much during baking, and the filling may not set properly. For best results, use a standard creamy peanut butter like Jif or Skippy.
Q2: Why did my cookies spread too much and lose their shape?
A: The most common causes are:
- Butter too warm: Ensure your butter is softened but still cool to the touch, not melted or oily.
- Dough too warm: If your kitchen is very warm, the dough can become soft. If the dough feels sticky or soft after mixing, chill it for 20-30 minutes before shaping.
- Incorrect flour measurement: If you measured your flour by scooping directly from the bag with the measuring cup, you likely used too little. The best method is to spoon the flour into the measuring cup and level it off.
Q3: Can I make these cookies ahead of time?
A: Absolutely! You have a few options:
- Dough: The cookie dough can be made, shaped into logs, and frozen on a baking sheet. Once frozen solid, transfer them to a zip-top bag. Bake from frozen, adding 1-2 minutes to the baking time.
- Assembled Cookies: The filled cookies can be stored in an airtight container at room temperature for 2 days or in the refrigerator for up to a week. They also freeze beautifully for up to 3 months.
Q4: My filling is too thick/too thin. How can I fix it?
A: The consistency of the filling can vary based on the brand of peanut butter and the temperature.
- Too Thick: Add more milk, one teaspoon at a time, until it reaches a pipeable consistency.
- Too Thin: Add more sifted powdered sugar, a tablespoon at a time, until it thickens up.
Q5: Can I make these gluten-free?
A: Yes! You can replace the all-purpose flour with a 1:1 gluten-free baking blend. The texture may be slightly more crumbly but will still be delicious.
Q6: Is it necessary to roll the dough in sugar?
A: While not strictly necessary, it is highly recommended. It adds a subtle crunch and a slight sparkle that mimics the original cookie and enhances the overall texture.
Q7: Can I use chunky peanut butter?
A: Yes, if you prefer some peanut pieces in your cookie and filling, chunky peanut butter will work well.
Q8: Why do I need to chill the dough?
A: You may not need to, but if your dough is overly soft or sticky from a warm kitchen, a brief chill (20-30 minutes) will make the dough much easier to handle and shape, and will help prevent overspreading.
Q9: How can I get my filling to look professional?
A: For a bakery-style look, pipe the filling onto the cookie. Spoon the filling into a zip-top bag, snip off a corner, and pipe a swirl onto the bottom cookie. This looks much neater than spreading it with a knife.
Q10: My cookies are too hard. What went wrong?
A: The most likely culprit is overbaking. Remember, the cookies will continue to firm up as they cool on the sheet. Take them out when the edges are just set but the centers still look soft and slightly underdone.
Conclusion
Baking a batch of homemade Nutter Butters is more than just following a recipe; it’s a rewarding culinary adventure. The process of shaping each cookie and whipping up the creamy filling is a joyful, hands-on experience that fills your kitchen with an incredible aroma. The final product—a perfectly formed, decadent peanut butter sandwich cookie—is a testament to the power of homemade goodness.
These cookies are guaranteed to impress, evoking a sense of nostalgic delight while simultaneously offering a far richer and more satisfying flavor than anything you can buy off a shelf. So, preheat your oven, grab your peanut butter, and get ready to create a new classic that will have everyone asking for the recipe.
